It has been a while since I added to the blog page – I blame inertia!
This odd bird was originally put together for the Lower Clarence Arts and Crafts Association (LCACVA) annual Small Works (8×8) Exhibition. The format of the show is that entrants buy an 8″ by 8″ canvas with their entry fee. The canvas must be used in the artwork, and the finished piece may be no larger than 8″ wide by 8″ high. There is no limit on how far the work may protrude from the frame, and the piece may be designed to as a sculpture, sitting flat on a plinth. Each year, the event has a different theme – this year the theme was ‘From My Window’.
I do like to have a little fun with this event. So my entry pictured a bird bursting through the canvas and out of the frame.
After the exhibition was over, I re-housed the odd bird – putting him on the shield shaped mount. Recycled, repurposed and christened ‘The Librarian’.
This was the first piece I’ve done that is more or less figurative, instead of abstract or geometric. The odd bird was carved from Jacaranda, and the glass eyes (and eyelashes) were provided by my wonderful Su from Xandolla Glass Art.
This year seems to have been crazy busy. A lot of my time was taken up with making for the ‘Out of the Forest’ exhibition – but surely I did more than that? I know I’m not the fastest maker out there, and I am retired, but I’m not that slow – or am I? Time to take stock.
After a dive into the various photo storage sites I have, plus a bit more, I realised that not all of my work has been recorded as images, and there are plenty of other domestic activities which get me out of the shed – lawns, baking days, shopping runs, duty days at Ferry Park, etc. However, we did get a fair bit done.
The big job in the first half of the year was to finish painting the house and to replace the flooring in four rooms in the house. We laid a hybrid floating floor system, and in two of the rooms, the flooring was laid in a herring bone pattern! The videos etc on the computer make it look easy. It might be easy if you have learned all the tricks of the trade – I had much to learn. I have no photos!
Realeaux Triangle in curly Mango
The first piece finished was the Realeaux Triangle in curly Mango. This piece was entered in the Wood Symphony Gallery ‘Turned and Sculpted’ on-line exhibition and was sold to a US based collector.
A Realeaux triangle is one of an interesting family of geometric shapes. The Realeaux forms all have a constant width or ‘diameter’, like a circle. Look it up on Wikipedia!
Bud Form – Silky Oak
I finished another sculpture in the first half – a small ‘Bud Form’ in Silky Oak. This was pretty much a prototype for a larger piece in curly Mango that has only just been started!
I spent a bit of time giving a colleague and fellow Clarence Valley Woodworker a hand to make his first piece of furniture – a rocking cradle for his soon to be born grandson. While this was happening, I began working on a hall table.
From around May through September, I was working on pieces for the exhibition.
Realeaux Triangle #2
First off was a smaller Realeaux triangle – also in curly Mango. This piece was made partly in response to a query from Wood Symphony Gallery.
Sci-fi Tri-spoke sculpture – curly Mango
The ‘Sci-Fi Tri-spoke’ came from an idea I saw on Pinterest, but significantly altered and developed until the original is only vaguely recognisable. The shape of piece reminds me of spaceships in old sci-fi comics when I was kid. This was a challenging piece to build. Although the blank was one heavy billet of mango wood, the piece is surprisingly light.
Hall table – Sily Oak inlaid with butterfly keys and a dragonfly
I had made a similar table in Banksia – this one was from a piece of Silky Oak that had been leaning against the wall of my shed for a few years. It had several small fissures in the top – these were filled with resin, then rows of Red Cedar butterfly keys were inlaid. The design required balance, so a Dragon fly was inlaid in the right hand side. This piece sold soon after the exhibition closed.
This clock and whiskey cabinet had been on my to-do list for a few years. Red Silky Oak, Red Cedar and some Camphor Laurel for the cabinet back. On the card, it says that the clock would suit a temperance household…
A boxed set – matching live edged boxes in Tipuana with glass by Su Bishop
A ‘Boxed Set’ or a set of boxes. Five boxes in Tipuana, lined with Jacaranda, and topped with glass by the wonderful Su Bishop of Xandolla Glass Art. I put them into the ‘Out of the Forest’ exhibition as a set, not for sale seperately. The Tipuana has a black stain in the sapwood, and the creamy heartwood will redden with time. The boxes have a live edge all round, and mitres of Australian Red Cedar.
Mobius #7 – Mango
Another Mobius piece, this one exploring the relationship between inside and outside diameters. I spent a lot of time chasing the lines and curves. This was made for the ‘Out of the Forest’ exhibition. Curly Mango, finished tung oil and wax. Happy with that.
Once the work for the ‘Out of the Forest’ exhibition was done and dusted, it was back to the accumulated backlog of stuff for our house and other work I promised for others.
Caravan Shelter
The first of these jobs was to build a shelter to protect the caravan from weather damage – especially the effects of sun and hailstorms. The shelter replaces an existing structure which had a few issues. The shelter was delivered in kit form. I demolished the existing structure, excavated and poured the footings, and with the help of a neighbour (thanks Tim Gherke!) erected the shed. There were plenty of lessons to learn along the way. We still have to put some drainage in place – but that will come next year.
Handrail on the deck outside Su’s shed.
Next was a handrail around the deck on Su’s shed. The main plan was to provide a good handrail to go up and down the steps to make it safer. Su is prone to a bout of vertigo from time to time. The handrail was made from recycled treated pine, and is really quite solid.
Kitchen bench and cabinet – Camphor Laurel, Flooded Gum and laminated pine.
The last big job to get finished was the kitchen bench and cabinet under for Su. Su chose the Camphor Laurel slabs back in March, but the ‘Out of the Forest’ show meant that nothing got done for the next seven months. The cabinet houses a small electric oven that we often use instead of the big oven for sheet bakes, warming food, etc. There is also space for recipe books, and odds and sods that normally litter the house. The cabinet is made from laminated pine, with a white washed paint finish, sealed with a flat water based poly sealer. The slabs for the bench were flattened and thicknessed by hand. The brackets and butterfly keys are Flooded Gum.
There are, of course, numerous other small jobs that got done along the way that I’ve ignored.
It’s easy to forget our achievements. We seem to be more inclined to remember the problems, the failures or other misadventures. It wasn’t until collected all of these photos that I began to appreciate the output. We should all take the time to remind ourselves of our achievements and the good things we’ve done. Do it now!
I was in a proper exhibition in a proper art gallery!
I am 74 year old retired engineer who grew up on a farm and worked with machinery almost as soon as I could walk. As a young man, I rode and raced motorcycles, and worked in motorcycle workshops, before I returned to Universty studies and became a professional engineer. I have no formal art training – my schooling was all mathematics and sciences. If you had suggested to a 20 year old me that I would sell art works through a gallery, I would have called you a crackpot. But here we are!
Out of the Forest was a three man exhibition – Pat Johnson, Andrew Grady and myself – woodworkers all.
Pat Johnson is a well known and highly regarded professional wood turner. Pat has worked demonstrating wood turning in the US and throughout Australia. Pat’s father-in-law taught him how to turn wood, and Pat was a good learner. His output ranges from commercial production (turning balustrades and the like for builders, through craft markets (pepper grinders, bowls and platters) through art pieces produced to sell in galleries. Pat calls himself The Travelling Woodturner and has been known to take his workshop with him as he traveled around Australia.
Pat Johnson’s wonderful mushroom farm!
Andrew Grady is a woodworker with many years of experience. He is part saw miller, part cabinet maker. He has a well equipped workshop, with some chunky machinery. He is also a man of many talents, having worked for many years in the oil drilling industry, with expertise in safety operations.
Andrew’s Love Seat from Jacaranda with Purpleheart inlays
I have a lot less experience as a woodworker! When we were first married, we had three kids and not much income. I made furniture that we needed – mostly chipboard and hardware shop pine. I did some renovations to the houses we lived in. I had the basic skills with tools, but no training in woodwork. It wasn’t until about 2004 or so that I started to take woodwork more seriously. I got some better tools, and I read a lot about furniture design and construction. Every project involved something new, something I had never tried before, and with every project, my skills (and tools) got better. At some point, I worked out that if I was going to put all that effort into a project, I might as well use good timber. Then about 4 years ago, I did a brief workshop on wood carving and sculpture.
Mobius #7 – Curly Mango
I met Pat and Andrew when I joined the Clarence Valley Woodworkers Association (then known as the Northern Rivers Woodworkers Association). Pat and Andrew are both long time members – I was new in the district. Around that time, Mark McIntyre and Steve Pickering started up the Coldstream Gallery Ulmarra, and were looking for artists. Pat, Andrew and I sold our work through the gallery from then. Initially, I was just selling bookmarks and small treen, but as I got more adventurous, Coldstream Gallery started to sell some of my boxes and sculptural pieces.
Wall piece – various timbers
Around February this year, Pat asked me to join he and Andrew in an exhibition that he was arranging for the Coldstream Gallery’s exhibition space, The Black Room. The exhibition was scheduled for late August, early September. My first reaction bordered on panic – there was a lot of work to be done, pieces to make, and only six months or so. When the second wave of Covid ramped up, lockdowns required that the exhibition be postponed. As it happened, all three of us needed the extra time to get our pieces made and finished. We each produced four or five major pieces, and a number of smaller pieces.
Pat’s Banksia Vase
The exhibition kicked off on Saturday 9 October. A few days before hand, we dropped our work off the gallery. I got my pieces there in a single trip, and while I was unloading, Andrew arrived with a couple of his large pieces. Andrew’s pieces were stunning, especially the red cedar and glass coffee table!
Andrew’s Burl Table – Red Cedar
The first time I saw the exhibition assembled was when I turned up for the opening on the Saturday morning – and I was blown away! It looked fabulous. The collection of pieces that had been worked on for six months or more was stunning. I couldn’t believe I was part of this! And the comments from visitors were just great!
Pat’s extraordinary Dragon Fly – Ebony
Outside the gallery, the state was still under Covid restrictions, and travellers were staying away, so numbers were down. None the less, we did have some good sales. The gallery offered to let us extend the exhibition for a few more weeks. According to the gallery, the exhibition was very well received, and even in the last week, people were visiting the gallery to see the exhibition.
Andrew’s Chevelle Mirror – Jacaranda
When I agreed to join the exhibition, I knew that it would involve six months of concerted effort, and very little else would be done around the house. Since the exhibition ended, I have been in catch up mode. However, I still have a backlog of pieces I would like to make, and I look forward to getting back to my work early next year.
A clock… Silky OakWith a secret…
Being part of the exhibition turned out to be a very exciting thing. The feed back (and sales) were just great. The challenge of putting together the pieces and getting them done was significant, and I didn’t get to make all the pieces I wanted to make, but I am proud of the work we put on display.
Hall table – Silky Oak
Would I do it again? Yes – but with about 12 months lead time!
Who knows?
Box Set – Tipuana, glass by Su Bishop
Apologies for the quality of the photographs!All of the in-gallery shots were taken using a mobile telephone as a camera. I have said before that as a camera, a mobile phone is useful for happy snaps at children’s parties. I se no reason to change my view.
This is my most recent sculptural piece, carved from Mango and Flooded Gum.
I had been thinking about the shape of the rotor of a Wankel rotary engine. The geometry of the Wankel engine is particularly interesting, because the rotor tips remain in contact with the inner surface of the engine as the rotor spins around its central gear. We had briefly studied the motor at the South Australian Institute of Technology (now re-badged as University of South Australia), and the term ‘trochoid’ stuck in my head. Consequently, I referred to it as the Trochoid as I worked on it. Surely a trochoid is a triangular solid shape?
I was wrong – it is not a Trochoid. A trochoid is the path of a point on a circle as the circle is rolled along a straight line. The shape of the piece is a Reuleaux Triangle – the points on the outer curve are equidistant from the opposite vertex. Interestingly, the Reuleaux triangle is one answer to the question “Other than a circle, what shape can a manhole cover be made so that it cannot fall down through the hole?”
According to Wikipedia, the Reuleaux Triangle also gives it’s shape to guitar picks, pencils, fire hydrant nuts and drill bits for drilling square holes – fascinating!
In the case of the Wankel engine, the rotor shape is a modified or flattened Reuleaux triangle, while the stationary part of the engine, the oval housing, is a variation of a trochoid, called an epitrochoid – the shape generated by a point on a circle rolling around a stationary circle.
This piece is based on the Reuleaux triangle and is carved from curly Mango wood and ebonised Flooded Gum.
I might save this for an event coming up later this year.
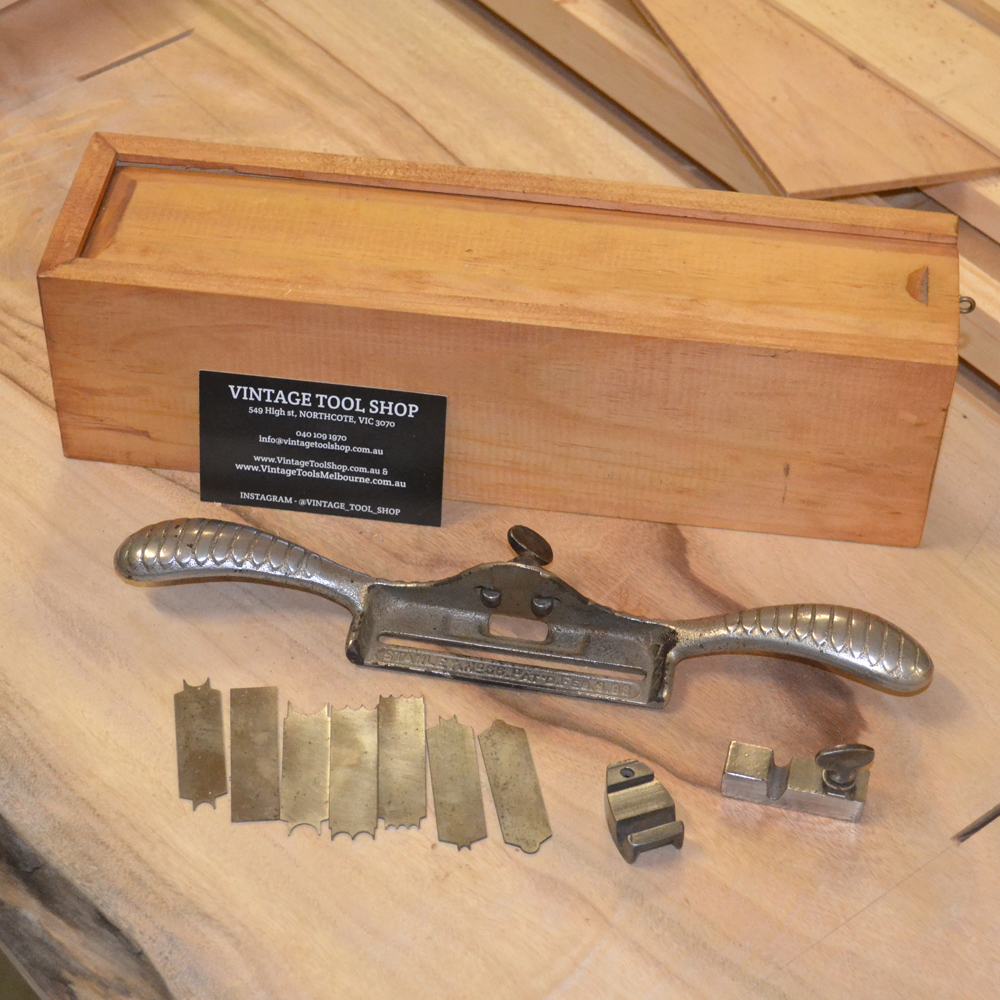
There is a piece that I want to make – have wanted to make for some time now – and I hope to start soon. One of the details I want is a beaded edge, so I needed a beading tool. I could have made a scratch stock, but I wanted a little more control and accuracy.
I follow Vintage Tools Melbourne on Instagram – @vintage_tool_shop or @vintage_tools_melbourne. I sent them a message asking if they had a beading tool for sale – they had two, both good working tools in good condition. I chose the one with the extra cutters and two fences – the original box was a real bonus.
The deal was quickly done, money transferred, and the parcel was in the next post. I received a photo of the packed box, and an invoice, complete with tracking number. A couple of days later, John the postman delivered a parcel.
The tool was in excellent condition – the cutters were free of rust, the nickel plating was in good order, and the box was just beaut. Of course I put the tool to the test – I cut a nice triple bead along the edge of a piece of scrap – it worked just fine!
On the basis of this experience, I have no hesitation in recommending Mari and Mike from the Vintage Tool Shop. One of these days, I will check out their very own Heritage Saws @heritage_saws, hand made by Mike – as they say, made by men, not machines.
For some time now, I have wanted to make a chair with a saddled seat. As time passed, I did buy a few tools that might come in handy. A week or three ago, a friend of a friend asked me to make a couple of bar stools with saddled seats. Of course I could do it – how hard could it be?
It turns out that its not that hard, or time consuming… And it gave me an excuse to put a few tools to work in earnest…
The AEG Super Clamp
I have used the Triton equivalent – borrowed during the Jacaranda show while I was demonstrating. The AEG is probably easier to use, and rock solid. The controls allow unlocking with out the risk of getting clobbered in the shins by the foot pedal.
To hold the seats while I hollowed them out, I screwed a block onto the back of each seat, and clamped the bock in the jaws. Worked well!
Arbotech Turboplane
This was the first time I used the beast. It works well, removes wood quickly, and only has a few vices. Beware ‘climb cutting’, where the cut is with the cut of the blade – in a split second, the blade can grab, dig in, create a great divot, and, if you aren’t careful, take a divot out of you. That said, cutting against the flow (think of cutting with a router – the work moves on to the teeth), the tool is quite controllable, cuts quickly and quite smoothly on wide flat curves like the chair seat.
On the down side, the thing chucks shavings and dust all over the place – best used outside. Even so, Su complained of shavings all over the vegetables!
The Scorp
This tool was something of a revelation. I bought it a few years ago – I saw it one in Carbatec, and wasn’t expensive, so I bought it to hollow out chair seats and maybe bowls. It sat unused until this week. The edge was pretty basic, especially the inside bevel. Wet and dry around a suitable scrap worked to get the edge of the inside bevel OK, then a lick on the back with the stones, and it was sharp enough.
I had kind of expected it to work like a draw knife, but it is quite different. Instead of slicing off the waste, it shaves the surface – making tightly curled shavings. It worked well, and dressed up the rough cut surface left after the Arbotech. It did a good job of shaping the seat.
The Chairmaker’s Plane
This little HNT Gordon plane has curved bottom – curved in two axis. It is a little tricky to use – the body of the blade has to be held at the correct angle to cut, but it worked really well. One of the seats had some pretty wild grain, but the little plane didn’t care – I got no tear-out to speak of.
Like all Terry Gordon planes, this was good to go straight out of the box. The blade held its edge, and was easy to sharpen as needed.
So far…
This is one of the two seats, after hollowing out with the Arbotec, shaping with the scorp and refining with the plane. Still more work required to fettle the shape, then sanding.
Earlier this year – BC (before Corona) – we bought a new bed. The old one had finally cries enough – or to be more accurate, our aging bones called enough. New mattress, new base. So now we needed a new bed head.
When we lived in Exmouth, I had made a bed head – even though the bed had a head end. This was more of a wall hung panel, zinc finish Mini-orb framed in pine – see below. The new bed head is much the same, but is framed with flooded gum with a black glaze type finish. Su is happy, I’m happy.